Installing Kubernetes on Windows 10 using Minikube
I recently started playing with Kubernetes and I used Minikube the have a working Kubernetes installation on my Windows 10 laptop. I wanted to share how to install Minkube on Windows 10 Pro (using Hyper-V).
Its quite easy to install Minikube using the Powershell (with Admin):
Invoke-WebRequest -uri https://storage.googleapis.com/minikube/releases/v0.28.2/minikube-windows-amd64.exe -OutFile minikube.exe
Invoke-WebRequest -uri https://storage.googleapis.com/kubernetes-release/release/v1.11.2/bin/windows/amd64/kubectl.exe -OutFile kubectl.exe
Copy-Item minikube.exe -Destination $Env:Programfiles\Minikube
Copy-Item kubectl.exe -Destination $Env:Programfiles\Minikube
Add C:\Program Files\Minikube to your windows path
$net = Get-NetAdapter -Name 'Wi-Fi' #assuming your network adapter is called 'Wi-Fi'
New-VMSwitch -Name "Minikube" -AllowManagementOS $True -NetAdapterName $net.Name
minikube config set vm-driver hyperv
minikube config set hyperv-virtual-switch Minikube
minikube config set memory 2048

minikube start
Jace 0.9
I am very happy to announce a brand new release of Jace: version 0.9. This is the first release in quite some time and Jace now supports .NET Standard 1.6. This means that Jace can now also be used in .NET Core applications.
The next version of Jace (1.0) will contain support for decimals and complex numbers (in addition to the current double support).
Release notes:
- Support for .NET Standard 1.6: support for .NET Core
- Cleanup of all code to support legacy .NET versions
- Support for DynamicFuncs: functions containing a dynamic number of parameters
- Support for Func’s with more parameters
- Bugfix #15: Formulas built from CalculationEngine do not take constants into account
Building Netflix style microservices in .NET – Getting Started
This is the first post of what will be a series of blog posts on Netflix style microservices in c# with .NET Core. The series is not meant as the ultimate guide for developing microservices in c#, but it is rather the summary of my personal experiences. I will describe how to setup an environment based on the Netflix microservice stack, how to develop a .NET Core Web API integrating with this stack, how to setup an API gateway, etc.
Introduction on microservices
Microservices are an architectural pattern that is becoming more and more popular. The pattern originated in web born companies such as Netflix, Spotify, Uber, Google,…. Luckily for us these companies shared their knowledge and experiences at various conferences with the rest of the world; resulting in the current rapid adaption of the microservice pattern. If you want to know more about microservices you can find some interesting videos recorded at tech conferences on YouTube from people working for Netflix, Spotify, etc.
Microservices are not the silver bullet that are going to make the development of every application smoother. They are probably even going to make the development of smaller applications more complex. But for building complex applications or the development within larger organizations, they will make the different components more decoupled and will bring more autonomy to the different teams. Resulting in more agility and a better time to market for each of the independent teams. If your organization is in a situation where software releases are complex and require the coordination of lots of people and components, then I recommend you to have a look at the microservices architectural pattern.
Martin fowler has a nice high-level overview on microservices: https://www.youtube.com/watch?v=2yko4TbC8cI
What is important to understand about microservices, is that microservices is not about very small (REST) services, but rather about how to decouple a large application into smaller components, each responsible for a specific bounded context. The responsibility over these different bounded contexts is then given to different teams. Communication between the different components is going over formal interfaces allowing the different teams to work in full autonomy. You could describe the microservice pattern as SOA done right 😉
An important component of a microservice architecture is the service registry. This registry is used by the various microservices for looking up the address and port of a specific microservice they which to call. Every microservice instance registers itself to the service registry at startup and will periodically send heartbeats. A popular service registry is Eureka of Netflix, but other implementations such as Consul exist too.
In my personal opinion microservices are not a revolutionary new pattern, but is rather building further upon insights gathered from:
- SOA
- DevOps
- DDD
- Test Automation
- …
Preparing the development environment
In order to setup a local development environment, you will need Windows 10 Pro x64 (for Hyper-V) and Visual Studio 2017.
Docker
The first component we need to install is Docker. Docker has a version for Windows that is fully compatible with all the Linux containers available online. Behind the scenes it is making use of a Linux kernel that is running on Hyper-V. You can find Docker for Windows at: https://www.docker.com/docker-windows
Eureka
Eureka is the service registry developed by Netflix (https://github.com/Netflix/eureka). For simplicity, I wanted to host this component within a fully self-contained Docker container. There exist a Docker build file for Eureka created by Netflix. But unfortunately this was a kind of garage project and the build file is outdated (is was using a very old Eureka version). So I decided to create my own Docker build file.
I have based it on Tomcat Alpine. You can find the build file and the necessary configuration files at my GitHub: https://github.com/pieterderycke/docker-eureka
FROM tomcat:8.5.15-jre8-alpine
MAINTAINER Pieter De Rycke <phdrycke@gmail.com>

RUN rm -fr /usr/local/tomcat/webapps/ROOT &&\
mkdir /usr/local/tomcat/webapps/ROOT && \
cd /usr/local/tomcat/webapps/ROOT/ && \
wget -q http://repo1.maven.org/maven2/com/netflix/eureka/eureka-server/1.7.0/eureka-server-1.7.0.war &&\
unzip eureka-server-1.7.0.war &&\
rm eureka-server-1.7.0.war

COPY config.properties /usr/local/tomcat/webapps/ROOT/config.properties
COPY eureka-client-test.properties /usr/local/tomcat/webapps/ROOT/WEB-INF/classes/eureka-client-test.properties
COPY eureka-server-test.properties /usr/local/tomcat/webapps/ROOT/WEB-INF/classes/eureka-server-test.properties

EXPOSE 8080

ENTRYPOINT ["/usr/local/tomcat/bin/catalina.sh"]

CMD ["run"]
If you do a check-out from my GitHub, you can build the image with the following command:
docker build --tag eureka .
Microservice Environment
During the rest of the blog series, I will make use of a Docker environment consisting of a dedicated Docker network and a number of containers running within this network.
The network is a simple Docker bridge network:
docker network create --driver bridge netflix-network
Next we create a Docker container from the Eureka image we just created:
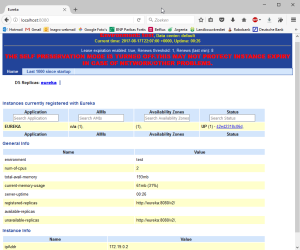
docker run -p 8080:8080 --name=eureka --network="netflix-network" --network-alias="eureka" eureka
We check with a browser if Eureka started successfully by going to http://localhost:8080:
Wrap Up
This was the first blog in what will be a serie on microservice development with C# and .NET Core. This first article should already provide you a high level overview on microservices and you should now also have a development environment running locally for developing microservices. In the next article we are going to create a first Web API Core microservice running in a Docker container and connecting to Eureka.
Android OpenID Connect Sample App
I decided to create a sample Android app that explains how you can intrate OpenID Connect authentication in your app, because I had the impression that not that much information was easily available on the internet.
In the sample I make use of the Google OAuth2 library for Java and I use the Android AccountManager for storing the obtained security tokens.
For those interested: have a look at my GitHub pages (https://github.com/pieterderycke/AndroidAccountManagerOpenidConnect) and if you would have questions or remarks don’t hesisitate to contact me.
Authenticating users with the Belgium eID in ASP.NET
Every Belgium resident has an eID card. This card functions as PKCS#11 keystore containing two X509 certificates (including their private keys): one for authentication and one for digital signing. These certificates are protected against a PIN/PUK code. The card can be used to authenticate the user in a web application using HTTPS with client certificate authentication. Because this mode of authentication makes use of two out of the three different types of information that can be used for authentication (something you know and something you have), it can be considered strong authentication.
In a classic HTTPS scenario, only the server will prove its identity to the user by making use of its X509 certificate, it is then up to the web application to do an authentication of the user in applicative code (over the secure SSL tunnel). With client certificate authentication, both the server and the user (in fact the browser) will prove their identity by making use of their X509 certificate.
eID authentication in ASP.NET
Authentication based on the Belgium eID card can be easily integrated into an ASP.NET web application. I have created the necessary code as an OWIN middleware component that can hooked into your web application and that will create a ClaimsIdentity representing the user. You can already find the source at Github (https://github.com/pieterderycke/Eid.Owin), but in the comming days I will also create a NuGet package for it.
The first thing you must do, is configure your web application to allow or require client certificates in IIS.
 Manager")
 Manager")
Once this is done, we can read out the client certificate in our OWIN middleware. There are a number of properties that can be parsed from the certificate. My code will create claims for all these properties
public class EidAuthenticationHandler : AuthenticationHandler
{
    protected override async Task AuthenticateCoreAsync()
    {
        var x509 = Context.Get("ssl.ClientCertificate");

        if (x509 != null)
        {
            ClaimsIdentity identity = ValidateX509Certificate(x509);
            return new AuthenticationTicket(identity, new AuthenticationProperties());
        }
        else
        {
            return new AuthenticationTicket(null, new AuthenticationProperties());
        }
    }

    private ClaimsIdentity ValidateX509Certificate(X509Certificate2 x509)
    {
        var chain = new X509Chain(true);
        chain.ChainPolicy.RevocationMode = X509RevocationMode.Offline;
        chain.Build(x509);

        X509Certificate2 citizenCertificate = chain.ChainElements[0].Certificate;

        if (citizenCertificate.NotAfter  DateTime.Now)
            throw new Exception("The citizen certificate is not (longer) valid.");

        //TODO verify if citizen certificate has not been revoked

        if (chain.ChainElements[1].Certificate.Thumbprint != "74CC6E5559FFD7C2DD0526C0C21593C56C9384F3")
            throw new Exception("Invalid Citizen CA certificate.");

        if (chain.ChainElements[2].Certificate.Thumbprint != "51CCA0710AF7733D34ACDC1945099F435C7FC59F")
            throw new Exception("Invalid Belgium Root CA certificate.");

        string firstName = Regex.Match(citizenCertificate.Subject, "G=([^,]*),").Groups[1].Value;
        string lastName = Regex.Match(citizenCertificate.Subject, "SN=([^,]*),").Groups[1].Value;
        string nationalRegisterIdentificationNumber = Regex.Match(citizenCertificate.Subject, "SERIALNUMBER=([^,]*),").Groups[1].Value;
        string nationality = Regex.Match(citizenCertificate.Subject, "C=([^,]*)").Groups[1].Value;

        // Based on information of: https://www.ksz-bcss.fgov.be/nl/bcss/page/content/websites/belgium/services/docutheque/technical_faq/faq_5.html
        bool isMale = int.Parse(nationalRegisterIdentificationNumber.Substring(6, 3)) % 2 == 1;

        ClaimsIdentity identity = new ClaimsIdentity(Options.SignInAsAuthenticationType);
        identity.AddClaim(new Claim(ClaimTypes.NameIdentifier, firstName + " " + lastName, null, Options.AuthenticationType));
        identity.AddClaim(new Claim(ClaimTypes.GivenName, firstName));
        identity.AddClaim(new Claim(ClaimTypes.Name, lastName));
        identity.AddClaim(new Claim(ClaimTypes.Gender, isMale ? "M" : "F"));
        identity.AddClaim(new Claim(ClaimTypes.Country, nationality));

        return identity;
    }
}
And for average Joe programer, this is super easy. All he/she has to add to his "Startup.Auth.cs" file is the following code and he/she can authenticate the users based on the eID card.
app.UseEidAuthentication(new EidAuthenticationOptions()
{
	SignInAsAuthenticationType = "Cookies"
});
Using IIS as a reverse proxy for Jenkins
Jenkins is one of the most popular build servers and it runs on a wide variety of platforms (Windows, Linux, Mac OS X) and can build software for most programming languages (Java, C#, C++, …). And best of all, it is fully open source and free to use.
By default Jenkins runs on the port 8080, which can be troublesome as this not the standard port 80 used by most web applications. But running on port 80 is in most cases not possible as the webserver is already using this port. Luckily IIS has a neat feature that allows it to act as a reverse proxy.
The reverse proxy mode allows to forward traffic from IIS to another web server (Jenkins in this example) and send the responses back through IIS. This allows us to assign a regular DNS address to Jenkins and use the standard HTTP port 80. In this guide, I will explain you how you can set this up.
What is required?
You need an installation of IIS 7 or higher and you need to install the additional modules “URL Rewrite and “Application Request Routing”. The easiest way to install these modules is through the Microsoft Web Platform Installer.
Configuring IIS
Once the two necessary modules are installed, you have to create a new website in IIS. In my example I bind this website to the DNS alias “Jenkins.test.intranet”. You can bind this of course to the DNS of your choice (or to no specific DNS entry).

Next you must copy the following web.config to the root of newly created website.
<?xml version="1.0" encoding="utf-8"?>
<configuration>
    <system.webServer>
        <rewrite>
            <rules>
                <rule name="Reverse Proxy to Jenkins" stopProcessing="true">
                    <match url="(.*)" />
                    <action type="Rewrite" url="http://localhost:8080/{R:1}" />
                </rule>
            </rules>
        </rewrite>
    </system.webServer>
</configuration>
This rule forwards all the traffic to http://localhost:8080/, the address on which Jenkins is running. It is also possible to configure this through the GUI with the URL Rewrite dialog boxes.
I you are not forwarding to a localhost address, you need to go into the dialogs of Application Requet Routing and check the “Enable proxy” property.

Jace now available for Xamarin.Android
Most of you probably already heard of Xamarin. Their products allow to develop in C# for IOS and Android. The core of Xamarin is based on the Mono CLR, so although you will not have 100% compatibility with standard .NET code, must applications and frameworks should run with some minor modifications. If you want to know the effort needed to migrate your C# code to IOS or Android, you can try their .NET Mobility scanner (http://scan.xamarin.com).
I did the test by scanning Jace and discovered that a port to Android could be done with a limited amount of work. The release of Jace 0.8.5 is the result of this work. Due to limitations of Apple on IOS (no dynamic code), a port to IOS will take some additional time. But this is definitely on the roadmap for Jace.

You can find the new release of Jace at the usual places:
Book Review: The Silent Intelligence – The Internet of Things

Recently, I stumbled upon the book “The Silent Intelligence”. The book is an introduction to the internet of things. It is one of these books that after reading 20 pages, you are just hooked and you want to continue to read it until it is completely finished.
The internet of things is a term you frequently hear about in regular and tech press, but it is a term that is rather vague for the general audience. Most people think it means stuff like fridges allowing you to check your mail, configuring your TV over the internet to record a certain TV show, etc. But this has nothing to do with the Internet of Things.
As the book also clearly explains, the internet of things is about smart sensors and devices that collect statistics for machine driven decisions and processes. It about systems that can measure and predict if you will have a heart attack before you will actually have it, connected cars to reduce car accidents, ERP systems that exactly track the location and condition of specific goods, …
The book follows a practical approach and explains many examples, both existing systems and new business models of which the authors believe they will appear in the (near) future. People with an entrepreneurship mindset, will find it a great source of inspiration to extend their current business vision or business model, or maybe for the next big innovation 😉
A recommended read!
Jace.NET 0.9: your input is appreciated!
Most of the last previous releases were limited and only introduced bug fixes or new mathematical functions. Jace.NET has already a complete support for all the standard math, but for the next release I have decided to increase the scope: from version 0.9 forward Jace.NET will have full support for matrices!
The following syntax is planned:
- Definition of a matrix: A = [1,2,3;4,5,6;7,8,9]
- Scalar multiplication: 3*A
- Matrix multiplication: A*B
- Transpose: A’ or transpose(A)
- Select a matrix element: A[2,3]
- New functions: ones(3,3), zeros(3,3)
For the initial 0.9.x release(s), I have foreseen the following constraints to simplify the initial support for matrices:
- It will not be supported to use variables in matrix elements: so the following syntax will initially not be allowed: [1,2,3;4,var,6;7,8,9]
- All matrix elements will be interpreted as doubles in the engine (not as integers)
And now comes the part where you are involved as a reader: I would really like have your input.
- Would this satisfy you (matrix) needs?
- Is the proposal ok?
- Are the constraints acceptable?
- Besides matrix support, what else would you like to see in Jace.NET?
Hope to hear from you guys! ![]()
Native tick sound on button click with PhoneGap
PhoneGap is a good framework to build hybrid applications, but for a great usability the devil is in the detail. A difference with native buttons is that HTML5 rendered hyper-links don’t produce a click sound with PhoneGap. Such small difference gives directly a non standard user experience to your app. So I came up with a small PhoneGap plug-in to fix this small annoyance.
Java code:
public boolean execute(String action, JSONArray args, final CallbackContext callbackContext) throws JSONException {
	if("click".equals(action)) {
		try {
			cordova.getActivity().runOnUiThread(new Runnable(){
				public void run(){
					try {
						View view = cordova.getActivity().getWindow().getDecorView();
						view.playSoundEffect(SoundEffectConstants.CLICK);
					}
					catch(Exception ex) {
						callbackContext.error(ex.getMessage());
					}
				}
			});
		}
		catch(Exception ex) {
			callbackContext.error(ex.getMessage());
		}

		return true;
	}

	return false;
}
JavaScript code:
$(function() {
	$(document).on("click", ".sound-click", function() {
		cordova.exec(function () { },
					function () { },
					"SoundEffects",
        			"click",
        			[]);
	});
});
In order to have the click sound, it it sufficient to add the “sound-click” class to your HTML5 buttons (and jQuery referenced in your page).

